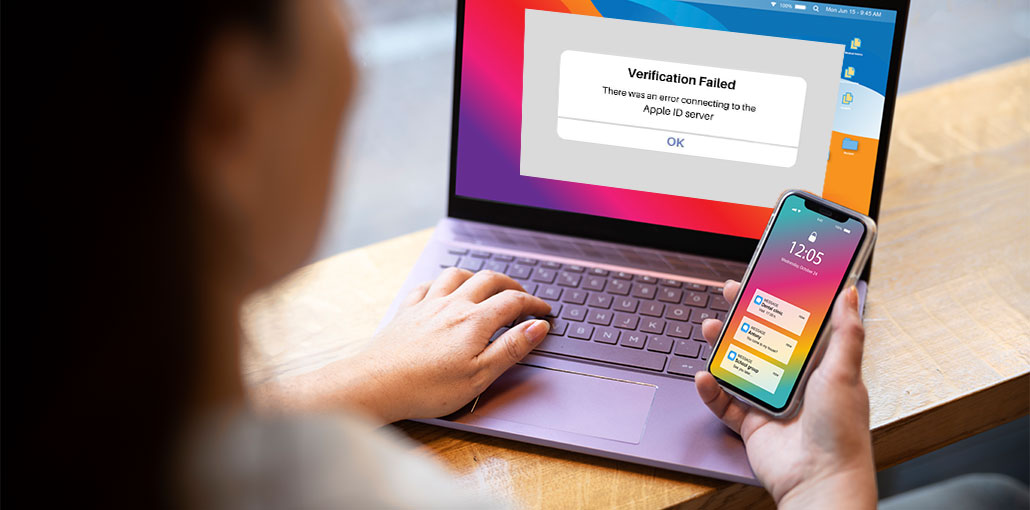
Suppose you encounter the ” There was an error connecting to the Apple ID server” prompt on your screen, but do not know how to fix it. This article will provide 9 solutions that you can implement!
To fix the ” There was an error connecting to the Apple ID server” error, it is important to understand the reason why this happens. Check out this article to find the probable causes.
Why does macOS Say There was an Error Connecting to the Apple ID Server?
Do you have a MacBook displaying the “Verification breakdown” notification stating, “There was an error connecting to Apple ID server”? The main reason for this error is that your MacBook isn’t connected to iCloud services. iTunes backups, and App Store.
The issue may be related to your Apple ID. Sometimes the Apple ID does not work. The error can start manifesting in date and time settings, WiFi connections, OS issues, and VPN interference.
There are a variety of reasons that could directly or indirectly cause the Apple ID server error. The most common causes are as follows:
- Unstable or weak Wi-Fi connection
- Incorrect date and time settings
- Missing or delayed verification code
- Incorrect Apple ID password
- VPN or antivirus interference
- iTunes or iCloud authentication glitches
- Temporary system or software bugs
- Network configuration issues
If you’ve understood the possible causes of Apple ID server issues, it’s now time to research solutions to solve the error connecting to Apple ID server.
Also read: How to Fix the Cannot Verify Server Identity Error on Your iPhone
How To Fix the Error Connecting to Apple ID Server
If you’re receiving that “Error Connecting to Apple ID Server” pop-up message while trying to sign in to the App Store, or even iCloud, do not be worried! This is a problem that each MacBook user has experienced at least once. Let’s begin with nine ways to correct the issue:
1. Check Network Connection
Are you unable to log in to your Apple ID server? The reason is your internet connection! Apple will attempt to sign you in via two secure methods: Wi-Fi and cellular data. It is essential to ensure you have the best connection by checking by wi-fi. Check out these steps to determine the status of your wireless network on a Mac:
- Hit the Apple menu > System Settings (or System Preferences). Then, click “Network” in the sidebar.
- You will be able to view the status of the network connection on the right side of your screen:
Green: The network is connected
Yellow: The web isn’t working, but it’s active.
Red: The service is not operating.
2. Check Apple Servers Status
To resolve the “There was an error connecting to the Apple ID server” error, you must confirm your Apple server status. You can check the official Apple website to see if the essential services are down on the server. For instance, if you use an App Store and log in using your Apple ID, ensure the Apple Store service is green, indicating availability.
3. Reset Network Settings on macOS
If the two methods failed, resetting your network settings in macOS is an excellent option. It’s as easy as clearing and adding to your wifi connection. Follow these steps to reset your network configurations on macOS:
- Go to the Apple menu, then select “System Preferences > Network”.
- Eliminate your Wi-Fi connection by selecting and pressing “-“.
- Re-include by hitting “+” and opting for Wi-Fi via the menu dropdown.
- Click the “Create” button, and then click “Apply”.
4. Correct Date and Time Settings
If you try to log in to your Apple service, for example, iTunes or iCloud, the device notices that the time and date do not match on the Apple servers. There will be notice issues, such as “Verification failed,” if they do not sync.
To fix Apple ID errors, you need to set the automatic time and date on your MacBook. The steps are like this:
- Go to the Apple menu, then click “System Preferences > Date & Time”.
- Check the box next to “Set date and time automatically”.
5. Sign Out and Sign Back In
If you experience an error connecting to Apple ID server, and everyone is aware that the Apple servers are operating, you can sign out of your Apple ID and sign back in to fix any issues. Follow the steps below to sign out, then sign in again to your Apple ID:
- To sign out of Apple ID, Select “System Preferences > Apple ID”.
- The overview tab must be open.
- Tap on the “Sign Out” option.
- Click the “Keep a copy” to ensure applications that save information.
- Now, select the “Sign In” button immediately.
6. Reset Apple ID Password
If the problem “There was an error connecting to the Apple ID server” persists, it is time to reset the Apple ID password. Another reason for this error is authentication, and not knowing how to reset your Apple ID password, which could cause the system to restart. The steps for resetting the Apple ID password are as follows:
- You need to choose “System Preferences > Apple ID”.
- Click “Password & Security”.
- tap on “Change password”.
- Type the password on your MacBook.
- Enter your new Apple ID password and select “Change”.
7. Get a Verification Code for Apple ID
When you attempt to sign in to iCloud from only one Apple device, the system typically transfers an authentication code to the other Apple device. If you don’t have an additional Apple device or are unable to obtain the 2FA verification code, you may follow the steps below to get an authorization code for your Apple ID:
- Go to “System Preferences > Apple ID”.
- Opt for “Password & Security”.
- Select the button “Get a Verification Code”.
- Paste this number whenever you log in to an alternative gadget or iCloud.com.
Also read: MacBook Won’t Turn On? 7 Powerful Methods to Start It Again
8. Restart Mac
Restarting a MacBook Pro or Air might help to remove that “Error connecting to Apple ID Server”. The specific steps to restart your MacBook are:
- Hit the Apple menu that appears on the screen.
- Click on “Restart”.
- Tick the box close to the word “Reopen Windows when logging back in”.
- Hit the “Restart” button to complete the restart.
If you find that the “Restart” option doesn’t work, you can force restart your MacBook using the “Command + Control + Power” keys.
9. Update macOS Software
If none of these fixes do the trick, go for the most obvious but radical option of getting an upgrade to macOS. The process can begin by checking whether updates are available. Follow these steps to install a software update to your Mac:
- Open “System Preferences > Software Update”.
- Click the “Download & Install”.
Preventing This Error in the Future
Here are some tips to avoid the issue again:
- Keep your device updated regularly
- Avoid unstable Wi-Fi networks
- Do not use unknown VPN services
- Enable automatic date and time
- Regularly sign in to your Apple ID to keep your session active
Conclusion
The following are the best 9 solutions to remove the “There was an error connecting to the Apple ID server” error entirely from your MacBook. If none of these solutions work, don’t despair and try a different method to solve the issue.
FAQs: Error Connecting to Apple ID Server
Why am I getting “Error Connecting to Apple ID Server”?
This error usually occurs when your device cannot connect to Apple’s authentication servers due to weak internet, incorrect settings, or temporary server issues from Apple Inc..
Does VPN cause Apple ID connection error?
Yes, VPN or proxy services can block or interrupt Apple’s authentication servers, causing login failures.
Why does Apple ID say verification failed on Mac?
It usually happens when your device time is incorrect or Apple servers cannot verify your login request.
Why is Apple ID not connecting on new MacBook?
New devices may have setup, network, or verification issues during initial Apple ID activation.
What should I do if error connecting to Apple ID server keeps coming back?
Try network reset, update macOS, disable VPN, and if it still persists, contact Apple Inc. support.


Leave a comment