Do you want to record a video of what’s happening on your desktop PC screen? If so, then this blog post will be very helpful for you as here we are going to introduce 3 effective ways to record video on a desktop PC.
Many people find this a very complicated process, but the fact is that there is no rocket science behind how to record screens on Windows 10 or desktop PC. With just the right tools and direction, even a beginner can professionally record any type of video on a desktop PC within seconds.
That’s why, to provide you the right direction and make the process easier for you, we’ve written this blog post where we’ll teach you about how to record screen activities in 3 different ways.
So, let’s get started!
Method 1: Using iFun Screen Recorder

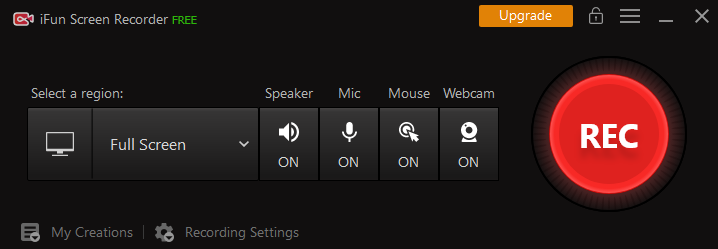
iFun Screen Recorder is a newly launched software which is packed with a lot of interesting features. Compared to any other online screen recorder available in the market, this software is pretty easy to use and intuitive which allows you to record video in Full HD or up to 4K without any lag.
The iFun Screen Recorder comes with a pretty straightforward interface that is equipped with all the necessary features that one needs to record any kind of screen activity.
The best part of this software is that along with multiple output formats, this free online screen recorder lets you record video without watermark. Besides, microphone, computer audio, cursor effects, and webcam options are also available to choose from.
Follow the instructions below to capture the video on a desktop PC using iFun Screen Recorder.
- Download the iFun Screen Recorder from their official website and follow the on-screen instructions to install it. After installing, double-click on the icon and launch it.
- Configure screen recording settings and turn on or off multiple options to suit your video recording needs.
- Click “REC” to start recording. You can pause or stop the screen recording by simply pressing the “Stop” and “Pause” buttons.
- Go to the “My Creation” section to preview, edit, and finally save the video to your chosen location.
Also read: Top 11 CPU Temperature Monitor Software For Mac
Method 2: Using Game Bar (Windows Built-In Screen Recorder)

Most people may not know, but it’s true that Windows 10 has its own built-in screen recorder that lets you record videos without any additional installation. It’s designed specifically for users who want to record gameplay, but it’s still an amazing free tool for video recording anything that happens on your Desktop PC screen.
So, if you are a Windows 10 user, here are some steps you need to take to record the screen.
- First go to Settings> Gaming> Game Bar and turn on the Game Bar option. You can also change the screen recording settings from here.
- Just press Win + G to launch the tool.
- Click on the Start Recording icon or press Win + Alt + R and it will start recording everything on your screen.
- When you’re done, click the stop recording icon on the floating bar and your video will be saved as MP4 in the Videos\Captures folder.
Method 3: Using Microsoft Powerpoint

Microsoft PowerPoint is another very simple and free way to record the screen of your PC. This option is only available on PowerPoint 2016 and the latest versions of PowerPoint 2013.
Here’s how to record video on a desktop PC using Microsoft PowerPoint.
- Open Microsoft PowerPoint and go to the Insert tab and click on Screen Recording.
- Select the area of the screen that you want to record and click the record button or Windows + Shift + R.
- To stop recording, just click on the stop icon or press Windows + Shift + Q.
- To export a screen recording video, right-click the video you want to export and select Save Media. The video will be saved to your chosen location.

![3 Effective Ways to Record Video on Desktop PC [100% FREE]](https://the-tech-trend.com/wp-content/uploads/2021/05/3-Effective-Ways-to-Record-Video-on-Desktop-PC-100-FREE.jpg)


Leave a comment