In the past, recording screens was a challenging and sometimes frustrating task for those using Chromebooks. Due to native recording support and the non-ubiquity of Chrome OS, it takes some time to find the right tool and ask around for an answer. Fortunately, the introduction of Chrome OS 89 brought an end to the saga. It has created an integrated Chromebook screen recorder to help us quickly and easily complete a recording task without needing to download third-party software or install plug-ins. In this blog, we discuss how to screen record on Chromebook with an easy method.
Why Use Screen Recording on Chromebook?
Screen recording is useful for:
- Creating educational tutorials
- Recording meetings or online classes
- Making YouTube or demo videos
- Saving important on-screen activities
Once you know how to screen record on Chromebook, you can create professional recordings in minutes.
Also read: 3 Effective Ways to Record Video on Desktop PC [100% FREE]
How to Screen Record on Chromebook: 3 Best Methods
Learn how to screen record on Chromebook with this easy step-by-step guide. Discover shortcuts, audio recording tips, and built-in tools—no apps needed.
How to Screen Record on Chromebook Using Keyboard Shortcut
If you don’t have any additional programs to download or install onto your Chromebook, the most efficient option is to use keyboard shortcuts. This allows users to record the entire screen, just a small portion of the screen, or a specific window. Here you can follow the instructions on how to screen record on Chromebook.
- Press the shortcut Ctrl + Shift + Show All Windows on the keyboard. (If there’s any “Show all windows” keyboard shortcut on your Chromebook, try pressing Ctrl+Shift + F5 to start recording your screen.)
- A toolbar appears in the lower right of your screen. Just click the screen record option from the menu.
- Select the recording mode you would like to use, for example, Full-screen, Partial Screen, and Windows. When you click it, the screen recording process will begin automatically.
- To end the screen recording process, click the “Stop Recording” icon.
How to Screen Record on Chromebook with Screen Capture
There’s a built-in Chromebook screen recorder in Chrome OS 89 and newer versions. It allows you to make screen recordings quickly and capture audio recorded by the microphone.
Step 1: Enable Screen Capture on Chromebook
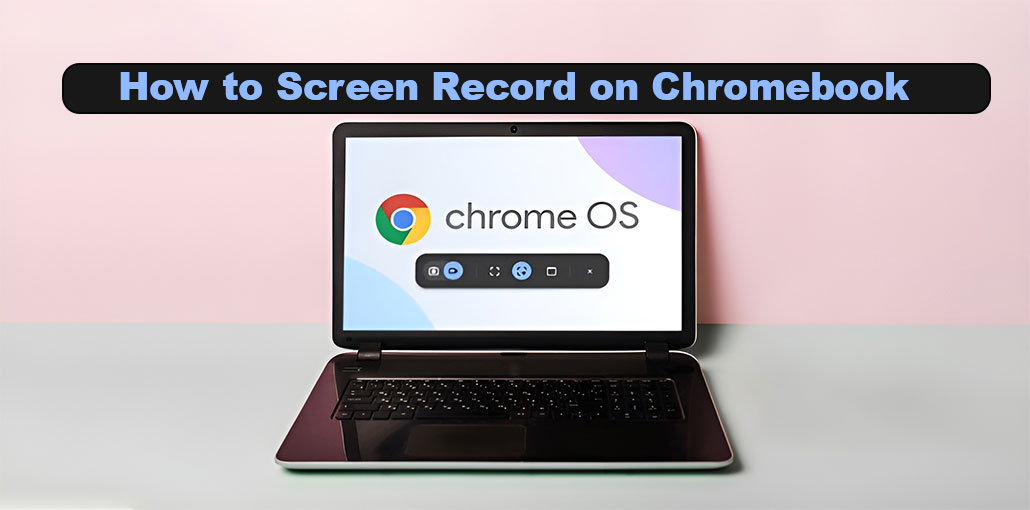
When you open your Chromebook, go to the lower right corner of the screen, find and click the clock on the shelf. You can click the arrow-shaped icon to open all options within the menu. You will see the screen Capture in there. Just click it, and you will see the recording toolbar show up at the top of your Chromebook desktop.
There are two record modes in the Screen Capture toolbar. The first is a camera-shaped icon that allows you to capture static images and take screenshots on a Chromebook. The second is video-shaped and allows you to record screen videos, which is useful.
Step 2: Choose Recording Area
Chromebook offers three options for recording the screen, including Full Screen, Partial Screen, and Window. Based on the type of content you’d like recorded, pick the best method.
Step 3: Start screen recording on Chromebook
Depending on the type of area you select, the option to start recording will also be slightly different. For full-screen recording, press anywhere on the Chromebook desktop to start the recording task. In the case of Part Screen, the user must use the mouse to draw the region they want to record and then press the ” Record” button. To record a window, select the specific window that you want to record. Then you’ll see a three-second countdown on your desktop, and the recording will shortly begin.
Step 4: Save the file and verify the recorded file on Chromebook
The screen activity has been recorded; the user can press the red recording button to close the recording. A notification will show “Screen recording taken”. Then click “Show in folder,” and you’ll be directed to the local” Downloads” folder on Chromebook. Video will then be stored in WEBM format only, and you can play it back to examine it as you like.
Also read: How to Factory Reset Chromebook Without Password: 4 Best Methods
How to Screen Record on Chromebook Using Screencast App
If your device runs Chrome OS 103 and later, you can find a new screen-recording app on Chromebook called Screencast. Screencast is targeted at teachers and students. Additionally, it includes advanced recording capabilities like adding your face to webcam videos, creating annotations, generating a transcript, and translating. One important thing to note is that Screencast can only be used when the device is configured with English (US) or American (US) language.
- On the app launcher, search for it and tap the Screencast app to allow it to operate on Chromebook.
- Click on “+ New screencast” in the upper-left corner of Screencast.
- Based on the actual requirement, choose a full screen, a target window, or a portion of the screen to record. (By default, the webcam and microphones are on. If you don’t require these features, visit the settings to turn them off.)
- To start screen recording on a Chromebook, click on the red recording icon.
- To add annotations to your recorded video, you can use the pen tool. pen tool. Additionally, it’s a great tool to adjust your webcam to what you want.
- Press the red stop button on the Shelf to close the screen recording.
- Your recorded video will be saved on my Screencast default feature in the Screencast application. The problem is that Screencast cannot save the video recorded locally. You must press “Shareat the upper right-hand corner to receive the link to play back your video.
Pro Tips for Better Chrome OS Screen Recording
- Use a quiet environment for clear audio
- Keep your screen clutter-free
- Record shorter clips for better performance
- Use an external microphone for better sound
These tips will improve your results as you practice how to screen record on chromebook.
Final Remarks
After you have completed the learning in this article, you should be able to figure out how to screen record on Chromebook. As you will see, various screen recording options work with different Chrome OS versions. Check which operating system you are using and then choose the one that best suits your needs.
FAQs: How to Screen Record on Chromebook
Can I screen record on Chromebook without apps?
Yes, you can screen record on a Chromebook without apps. ChromeOS has a built-in screen recording feature that works without any third-party software.
How long can you screen record on a Chromebook?
There is no strict time limit, but recording length depends on your device storage and performance. Longer recordings may affect system performance.
What format are Chromebook screen recordings saved in?
Chromebook screen recordings are typically saved in WEBM format, which is supported by most modern video players.
How to screen record on Chromebook with audio?
You can screen record on a Chromebook with audio by enabling the microphone option in the screen capture settings before starting the recording. Most Chromebooks support microphone audio recording.


Leave a comment