The persistent issue of ” Memory Integrity can’t be turned on” is a major problem, especially if you are looking to improve the security of your Windows systems.
In this complete guide, we examine the specifics regarding Memory Integrity activation issues, offering insight into issues you could face. We will explore the reasons for the ” Memory Integrity can’t be turned on issue, which range from hardware compatibility to virus attacks. You’ll gain expertise to resolve the issue successfully.
What Causes the “Memory Integrity Can’t Be Turned On” Error?
If you’re struggling with the “Memory Integrity can’t be turned on,” you’re not the only one. This problem may leave you feeling angry and worried about the security of your Windows system. In this article, we’ll look at the reasons why Memory Integrity may refuse to be turned on:
- Incompatible or outdated drivers
- Corrupted system files
- Virtualization disabled in BIOS/UEFI
- Missing Windows updates
- Conflicts with third-party software
- Hardware compatibility issues
Also read: Kernel Security Check Failure Error: Easy Fixes for Windows 10
How to Fix the Memory Integrity Can’t Be Turned On
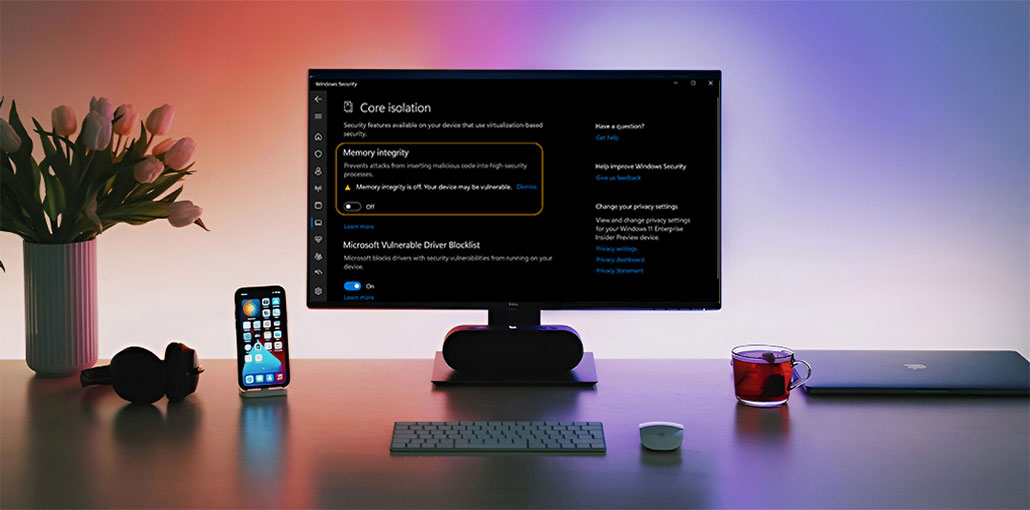
The most common problem that may occur to the Windows user is when the error Memory Integrity can’t be turned on, and is followed by the error message that reads “Memory Integrity can’t be turned on,” or “Memory Integrity is off”.
Memory Integrity is a vital Windows security element that protects your system from malware-related violations and attacks at the kernel level.
However, when Memory Integrity is enabled, it monitors and protects the system memory, making it an effective defense against more advanced threats.
1. Enable Memory Integrity Through Registry Editor
If you find that the Memory Integrity feature continues in a disabled state, it is possible to manually activate it by using the Registry Editor.
Here’s how to do it:
Step 1. Begin the procedure using the “Start” menu, typing Registry Editor and then clicking “Run as administrator.”
Step 2. Make sure you confirm by clicking “Yes” in the prompt.
Step 3. In the top address bar of the Registry Editor, you can type in this address:
HKEY_LOCAL_MACHINE\SYSTEM\CurrentControlSet\ControlDeviceGuard\Scenarios\HypervisorEnforcedCodeIntegrity
Step 4. Locate and double-click the “Enabled” key, input 1 in the “Value Data” field, and then press “OK.”
After you have completed these steps, reboot your system to implement the changes. After the reboot, all issues with the Memory integrity can’t be turned on will be addressed effectively on your computer.
2. Update USB Drivers
Updating your USB drivers is an easy process, and the steps below will help you resolve issues with outdated drivers and prevent interruptions.
Step 1. Press the “Windows key + X,” then select “Device Manager” from the menu.
Step 2. Select the USB device on which you plan to upgrade the driver.
Step 3. Right-click on the USB device to reveal other options.
Step 4. After that, click on the name of the device and select “Update Driver” from the context menu.
Step 5. Choose “Search automatically for updated driver software.”
Step 6. Windows will prompt to search for a new driver and then install it automatically
3. Run the System File Checker (SFC)
To resolve the memory integrity error that could be due to corrupted system files, use the System File Checker (SFC) tool following these steps:
Step 1. Select the “Windows” button on your keyboard.
Step 2. After that, enter Command Prompt and then select “Run as administrator.”
Step 3. Input the command: sfc /scannow and hit “Enter.”
After the scan is complete, you can reboot the Windows system.
You can try activating memory integrity through:
Step 1. Navigate to “Windows Security.”
Step 2. Click “Device security.”
Step 3. Then, select “Core isolation details.”
If problems persist after repairing and scanning driver or system files, follow the next troubleshooting process.
4. Clean Install Windows
If you encounter the”Memory Integrity can’t be turned on” issue, opting for a clean installation is a good idea. It’s important to know that this procedure will remove all your personal files and data. For a clean installation of Windows 11 using a USB drive, here’s the best way to do it:
Step 1. Start the computer, making sure connected to the USB drives.
Step 2. Select any key to start the boot process from the USB device, if asked.
Step 3. On the “Windows Setup” screen, click “Next.”
Step 4. Choose “Install now.”
Step 5. If it’s a reinstallation, and you don’t own a product key, select “I don’t have a product key” and then click “Next.”
Step 6. If applicable, select your “Windows 11” edition that the license key activates.
Step 7. Click “I accept the license terms” and select “Next.”
Step 8. Select “Custom: Install Windows only (Advanced)” to ensure a clean installation.
Step 9. Select the partition with the currently installed (typically “Drive 0”) and click “Delete.”
Step 10. Select the empty drive (“Drive 0 Unallocated Space”) and then click “Next.”
5. Scan Windows Memory for Malware
If your PC is having issues, like the Memory integrity can’t be turned on error, malware infections are possible causes.
Conducting a malware scan using Windows Security or a reliable third-party antivirus software is vital. For a malware scan with Windows Security, adhere to these steps:
Step 1. Begin the process by pressing the “Start” key and typing Windows Security in the search bar.
Step 2. Select the “Windows Security” app from the results of a search.
Step 3. Within the app, open “Virus & threat protection.”
Step 4. Click on Scan options.”
Step 5. Opt for a “Full scan” and click “Scan now.”
Step 6. Stick to the on-screen instructions to complete the scan.
Step 7. After that, you must restart your computer after the scan has been completed.
This comprehensive malware scanner will identify and eliminate threats, resolve memory integrity issues, and enhance the overall security of your Windows system.
Also read: Top 10 Malware Removal Software
6. Start Windows in Safe Mode
To resolve issues and troubleshoot problems like the “Memory Integrity can’t be turned on” error, using Safe Mode in Windows can be an effective way.
Step 1. Click “the “Start” button found in the lower left corner of the Windows screen.
Step 2. Navigate towards the ” Power” icon and simultaneously press the keyboard’s “Shift” key.
Step 3. While pressing your “Shift” key, select “Restart.”
Step 4. Allow your Windows system to reboot. Then, select”Safe Mode” from the menu to begin the boot process in Safe Mode.
This creates an environment where only necessary system processes are, which allows for effective troubleshooting and the possibility of resolving the memory Integrity error.
7. Factory Reset Windows
If you are experiencing an odd issue with the performance of your Windows 11 computer unsolved, or Windows has become cluttered over time, or you’ve had issues with your registry with no easy solution, attempting an initial factory reset might be the solution.
This feature lets you refresh or install Windows 11 without losing any downloaded applications or files.
To perform the factory reset process on the Windows 11 laptop or desktop while retaining your files, follow these steps:
Step 1. Click the “Windows key + I” keys to open “Settings.”
Step 2. Navigate to “Update & Security.”
Step 3. Select the “Recovery” option.
Step 4. Under the “Reset this PC” or “Reset PC” section, click “Get Started.”
Step 5. Opt to “Remove everything.”
Step 6. Choose between “Local reinstall” or “Cloud download” to reinstall the system.
Step 7. Click “Next” If Windows warns you to revert to a previous OS version.
Step 8. Confirm the reset by clicking “Reset” when prompted. Windows will then reboot after a period of time for the reset process.
Final Thoughts
This “Memory Integrity Can’t Be Turned On” error is usually caused by invalid drivers, disabled virtualization, or a corrupted system file. By updating drivers, fixing Windows files, enabling virtualization, and keeping Windows updated, most users will be able to resolve the issue.
FAQs: Memory Integrity Can’t Be Turned On
Why can't I turn on Memory Integrity in Windows?
Memory Integrity may not turn on due to incompatible drivers, corrupted system files, disabled virtualization settings, or conflicts with third-party software.
Can Windows 11 run without Memory Integrity?
Yes, Windows 11 can run without Memory Integrity enabled. However, enabling it provides an extra layer of security against sophisticated threats.
Can outdated drivers cause the 'Memory Integrity Can't Be Turned On' error??
Yes, outdated or incompatible drivers can prevent Memory Integrity from being enabled. Updating the affected drivers often fixes the issue.
is it safe to ignore the 'Memory Integrity Can't Be Turned On' warning?
Your PC will continue to operate normally even if this feature is disabled. However, keeping it turned off can reduce your system's protection against sophisticated malware, unauthorized code execution, and other advanced security risks.


Leave a comment